House Update – June 16 and 17
This weekend was all about the kitchen. Well, all about the kitchen and the porch. Well, all about the kitchen, the porch and the cat.
Saturday morning we finally got the stove installed.
We decided on a slide-in White Fridgidaire. We purchased it from FullHouseAppliances.com and we could not be more pleased with the service. The stove arrived with some cosmetic damage and the store shipped out a new enameled top. That top arrived chipped again and they had no qualms about sending out yet another one. Great customer service, we are very pleased.
Out of boredom with take-out and sandwiches, I broke down and bought a really nice toaster oven this week so we were finally able to cook meat in our new house! Good to know: you can make shake and bake in a toaster oven. We got this really nice Oster one. I highly recommend it. With the convection mode, things cook nice and even and you can really control the temperature much better than with other toaster ovens.
It’s just $79 and was a super life-saver. I regret not buying it earlier! I had it for just 3 days before the stove was installed. I should have bought it right when we moved in!
The other purchase of the week was this nice dehumidifier. The basement has been quite damp. I think the digging of the porch footings did a number on the soil around the foundation of the house and the fact that the porch doesn’t have gutters yet isn’t helping things. We have a bit of mold growing in the basement and we need a good dehumidifier to keep things dry.
We have also had good luck with these little condensate pumps. We have on on the furnace, one on the hot water heater, and one on the dehumidifier. They come with the tubing which is handy though we have had to buy extra tubing to run over to the drain. Not a big deal all in all and they are super easy to install.
We bought it on Amazon, as usual. We spend more than $600 a month on Amazon. It’s amazing how much your spending habits change when you can comparison shop online and when you come to rely on the convenience of 2nd day delivery. We price check everything at home depot with Amazon.com to see what we can save. In general, you don’t pay sales tax with Amazon but that’s quickly changing as states wise up to the loop-hole. My pocketbook is sad but I know it’s the right thing to do..
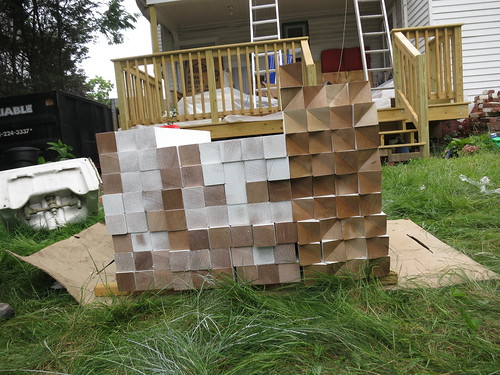
On Saturday, after getting the dehumidifier set up and the stove in, Stefan went to work making a jig for the balusters. The toe-rail of the porch is a 2 piece design with a peaked top to prevent water from resting on the toe rail. This requires that we cut a notch out of the balusters.
To make things more complicated, we are putting the balusters on the diagonal. We built a nice jig to ensure we are cutting the balusters at the correct angle.
While Stefan was working on these odds and ends, I continued painting the handrails and toerails and the sides of the balusters. I used a very nice spray gun that I LOVE! I talk about it here:
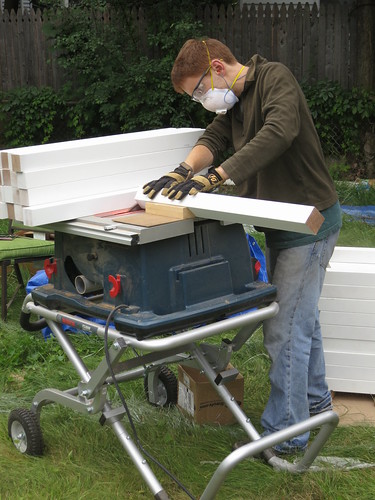
Here you can see my handsome husband in his ppe (personal protective equipment) cutting balusters all day.

Two hundred and ten balusters later, we have all the pieces cut so the porch guys can start finishing up that project. We primed all the pieces and elected not to paint them since we really want to spend our time getting the inside of the house up to par. The primer will protect the wood until we get around to painting everything with the Sherwin Williams Duration Exterior paint we are planning on using on the porch.


Vector is starting to get curious about the rest of the house. We need to put some doors back on the gutted rooms and we should be able to let Vector have full reign of most of the house in a couple weeks. For now he is confined to the piano room and the bedroom. We do bring him into the kitchen when we are working on dinner but we set a scrap piece of MDF across the door and he’s got maybe another week until a 2 foot barrier will no longer be an obstacle.
Sarah
House Update June 2/3
I have a confession, we didn’t get much done this weekend. We slept in and rested up. The first order of business was to run 1†PEX from the water main to the  other side of the basement where we are putting the manifolds to supply water to the rest of the house. From the 1†pex, we split ¾†to the hot water heater and ¾†to the cold side manifold. We are using red and blue colored pex to keep things very explicit and easy to see, we have decided to install a new Heat Pump Water Heater, for this we already know that professional help is a must.
The basement manifold diagram:

and the second floor manifold

I used the fun PEX tool to add valves to the manifolds. This allows us to shut of anything in the basement. Without the assistance from this CSG Renovation: Basement company we’d have had been totally clueless as to where to begin from. Nonetheless, we also bought these nice zip ties to allow us to label each run.
We have the basement manifolds mounted and we have the supply to the kitchen sink run and hooked up in addition to the washing machine supply and the 1st floor bathroom. We just tapped onto the copper that is already existing in that bathroom since we don’t plan on changing the layout until after we have another bathroom completed. Here is a great site to find a good general contractor www.calgarygeneralcontractorpros.ca if you live in the Calgary area.

From the basement, we still need to run ¾†pex up to the 2nd floor (through the chimney void) and add in the 2nd floor manifold. The priority is getting the kitchen done so our 2nd floor bathroom will have to wait a couple weeks.
Sarah
House Update – Memorial Day Weekend
Memorial day was all about the plumbing drain. We had got our roof recently fixed by a roofing st louis company and so it was time to fix the plumbing as well. Stefan decided to call in the emergency plumbing, they came into town to help out. Stefan and Fred pulled out a bunch of super heavy, 4†cast iron pipe. The work was back-breaking and difficult. We used the sawzall and use about a dozen saw blades. It was one blade per cut for the easy cuts. The final cut used 3 blades! We also found that putting a little mineral oil on the blade as cutting fluid, kept the blades cooler and really helped the cutting process. I think some actual cutting fluid would be better but the mineral oil seemed to work fine. They then replaced the cast iron pipe with PVC which is always an exercise in geometry. The whole thing will now be much easier to work with and we should be able to cut into the PVC to add drains as needed.

As an added bonus, we were able to get the drain for the wash down sink set up in the kitchen. After we got the supply done, we were able to transition from paper plates now that we have a sink big enough to wash a plate. It’s a nice change. On the recommendation of Stefan, we looked at these Top 5 Best Small Dehumidifier Reviews – 2019 [Updated], as we did not want the moist atmosphere of the kitchen to harm all the things kept in it.

Here you can see the supply and drain in the basement:

Our scap metal guy, Jose, is going to love these cast iron pipes. The copper we’ll probably take ourselves to a scrap metal place but we’ll need Jose to get the cast iron pipes out of the basement and 2nd floor so we’ll let him have those. He’ll be pumped I’m sure. He was excited with the couple of smaller pieces we had last time. We should call him soon. I’d like to get those out of the way.
You can see a long piece here:

This piece has the weight of a relatively light section at 57lbs. Â This is a 4′ strait section. Â The joints are easily double the weight.

This is probably the heaviest piece. Â I can’t even slide it across the floor.

While Stefan and Fred were working on the plumbing, Ann was going to town on the front and back porch ceilings and the porch posts. If you remember, last time she came out, she primed everything and this time she painted it in Sherwin-Williams Duration exterior paint in Accessible Beige in a Satin finish. It looks a little odd with the gray-white-mildewed aluminum siding but it’s part of the long-term plan and I’m less concerned about the short-term looks and I’m certainly not going to re-paint the porch. I learned more about Noble Painting as we would need to repaint the house exterior. I have already asked for the free estimate.

What would we do without the awesome in-laws? My parents are going to come up and help out in August as well. It really helps to have a supportive, handy family to help out on our big project.
Sarah
Oil Painting Final Work
Ok, so it wasn’t my final work but it was my best piece. The last 4 classes we did 2 paintings. This was the first of the 2-class paintings. The second one I never really liked. It just didn’t turn out quite as well. The premise of the 2 class paintings was the concept of under painting. We muted all the colors by mixing them with brown to really make them dark and bland. The purpose of the under painting is to allow the second layer of paint to really pop against the darker background. It gives a much richer, fuller painting. Once this wedding is over, I really want to start painting some more. I found it very relaxing. I could paint while Stefan works on electronics projects and spend some quiet time after work doing something very physically creative.  By which I mean, my job requires creativity but only in the abstract sense. Painting would allow me to really create something very physical and tangible. It is a totally different kind of mental stimulation which I really like. I need to find a nice easel. Should be do-able, I just haven’t found one yet. They are only like $30 new on Amazon for the cheap-y ones. Any recommendations? I’d like to stay under $100 but I’m not opposed to buying used.
Without further ado, the best Oil Painting I’ve ever done:


Plumbing
7/16/2011 | 3:51 am Permalink
Teaching oil painting requires more thought than might first seem seem. An eminent oil painter does not necessarily make a good teacher, for a good art teacher must understand how students learn.